Getting started
For this tutorial, we will only focuses in the implementation of the fully connected part of Jeremy Fix’s tutorial. In this page, we gonna see how generate the project and the role of each file.
Project generation
First, we need to generate an empty JAW project.
python3 src/jaw/JAWProject.py
Enter the name of your project and where save it.
Warning
Use an absolute path for your project filepath.
You will have this result:
yvregon@nostradamus:~/JAW$ python3 src/jaw/JAWProject.py
Enter a project name : tutorial
Enter a root folder (default : /home/yvregon/JAW) :
New JAW project generated.
And the following structure:
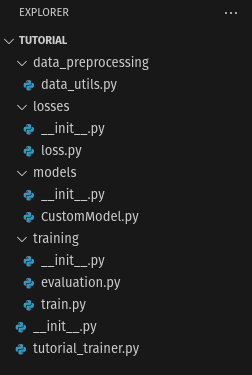
Our project structure.
File tree
For now, you will have a tree file like this :
Let’s have a closer look to this folder structure:
project_nameis the root of our project.data_preprocessingis where we put our code for everything related to the data preprocessing, such as dataset transformer or splitting method.lossesandmodelsare the folder where put our custom network models and loss classes.The
trainingfolder contain our functions that handle training and evaluation loops.project_name_trainer.pyis our “main” script: it’s here where we define our training process and launch options.
Tip
The project generation script produce automatic reStructuredText docstring, but you can also generate the same Sphinx documentation using a more readable docstring with napoleon extention (used by numpy for instance).